Favorite Proofing Workflow
Maak een favorite proofing galerij aan voor je klanten om ze eenvoudig hun favoriete foto's uit te laten kiezen en je workflow makkelijker te maken.
Gerelateerd
Jouw Favorite Proofing Workflow
Leer hoe je een favorite proofing galerij maakt voor je klanten zodat ze zelf hun favoriete foto's van de shoot kunnen uitkiezen. Deze kan jij vervolgens gebruiken om de definitieve galerij te creëren.
1. Watermerk fotoset aanmaken
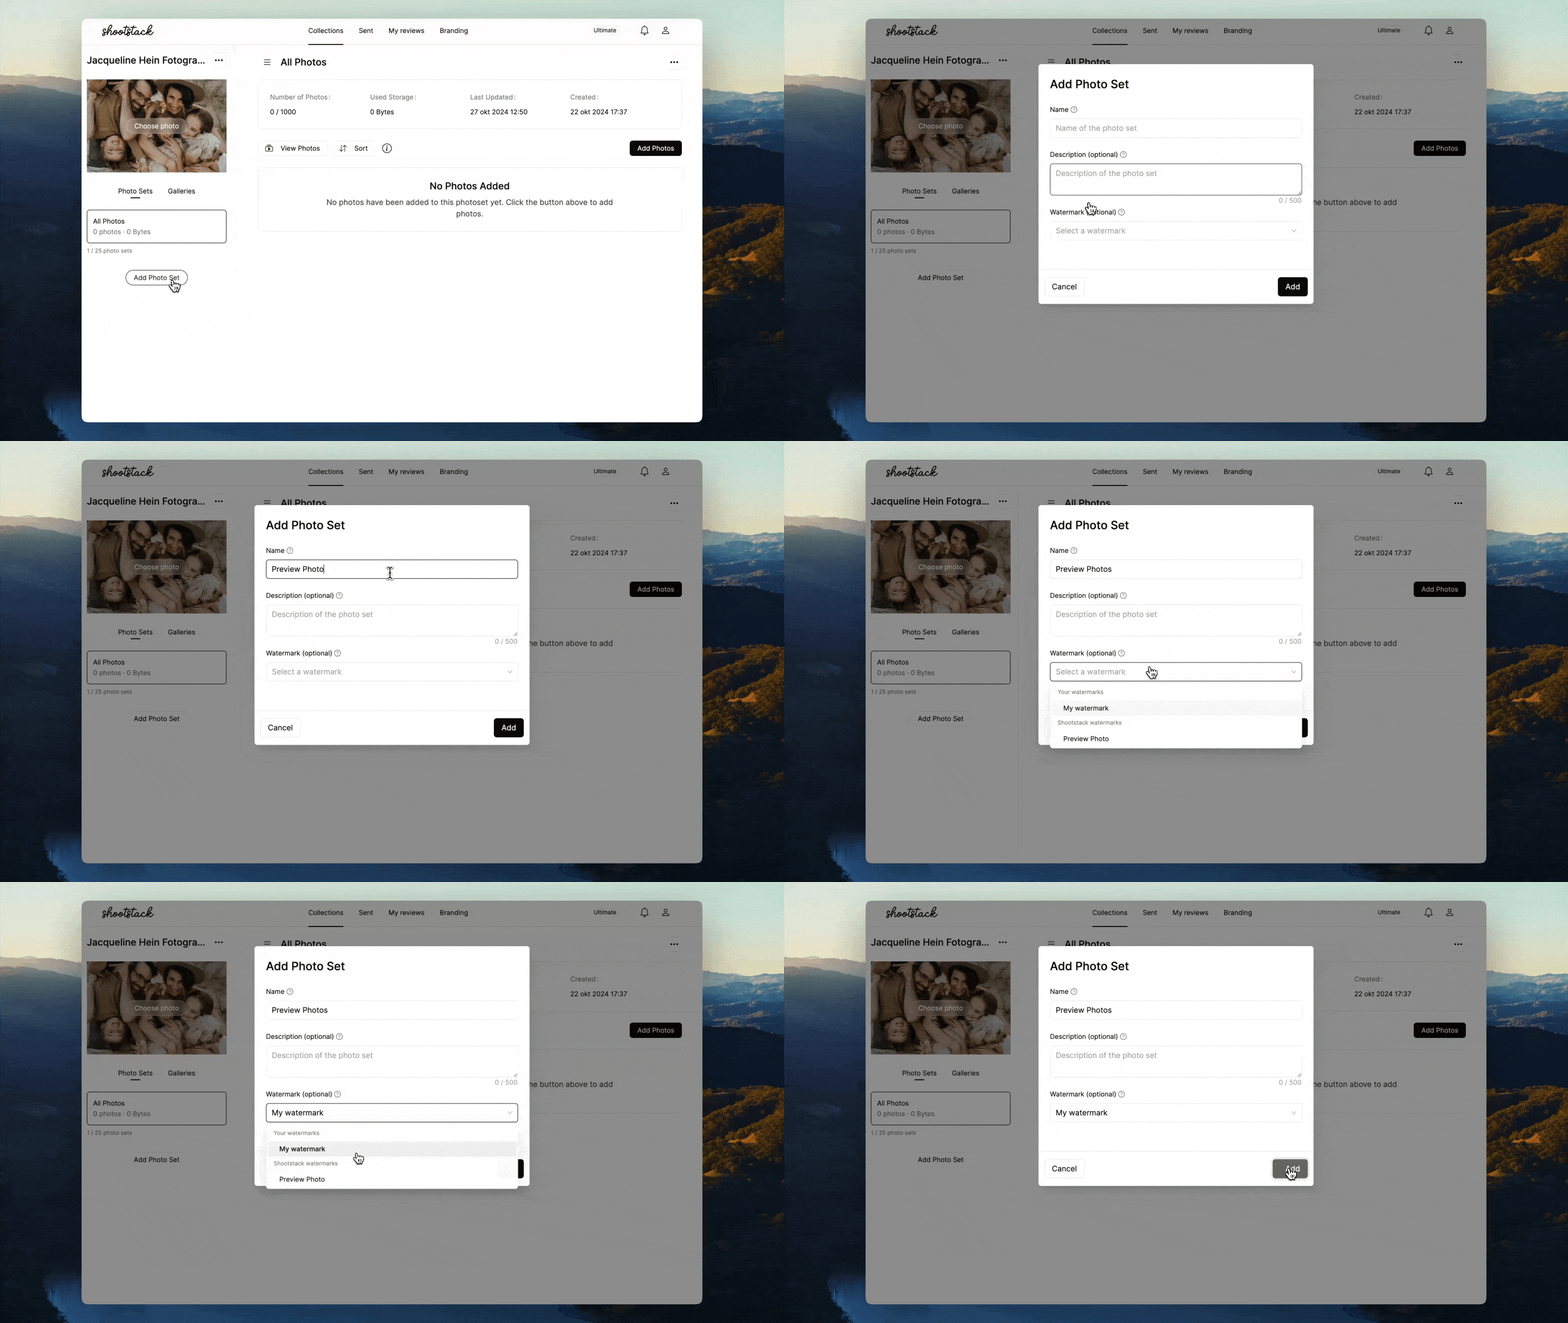
Zodra je een nieuwe collectie voor je shoot hebt aangemaakt, is de eerste stap het maken van een watermerk fotoset. Klik op Fotoset toevoegen en geef deze bijvoorbeeld de naam: Preview foto's. Selecteer vervolgens je eigen watermerk of kies het standaard watermerk 'Preview Photo' van Shootstack.
Je kunt je eigen watermerk toevoegen via het menu onder Huisstijl.
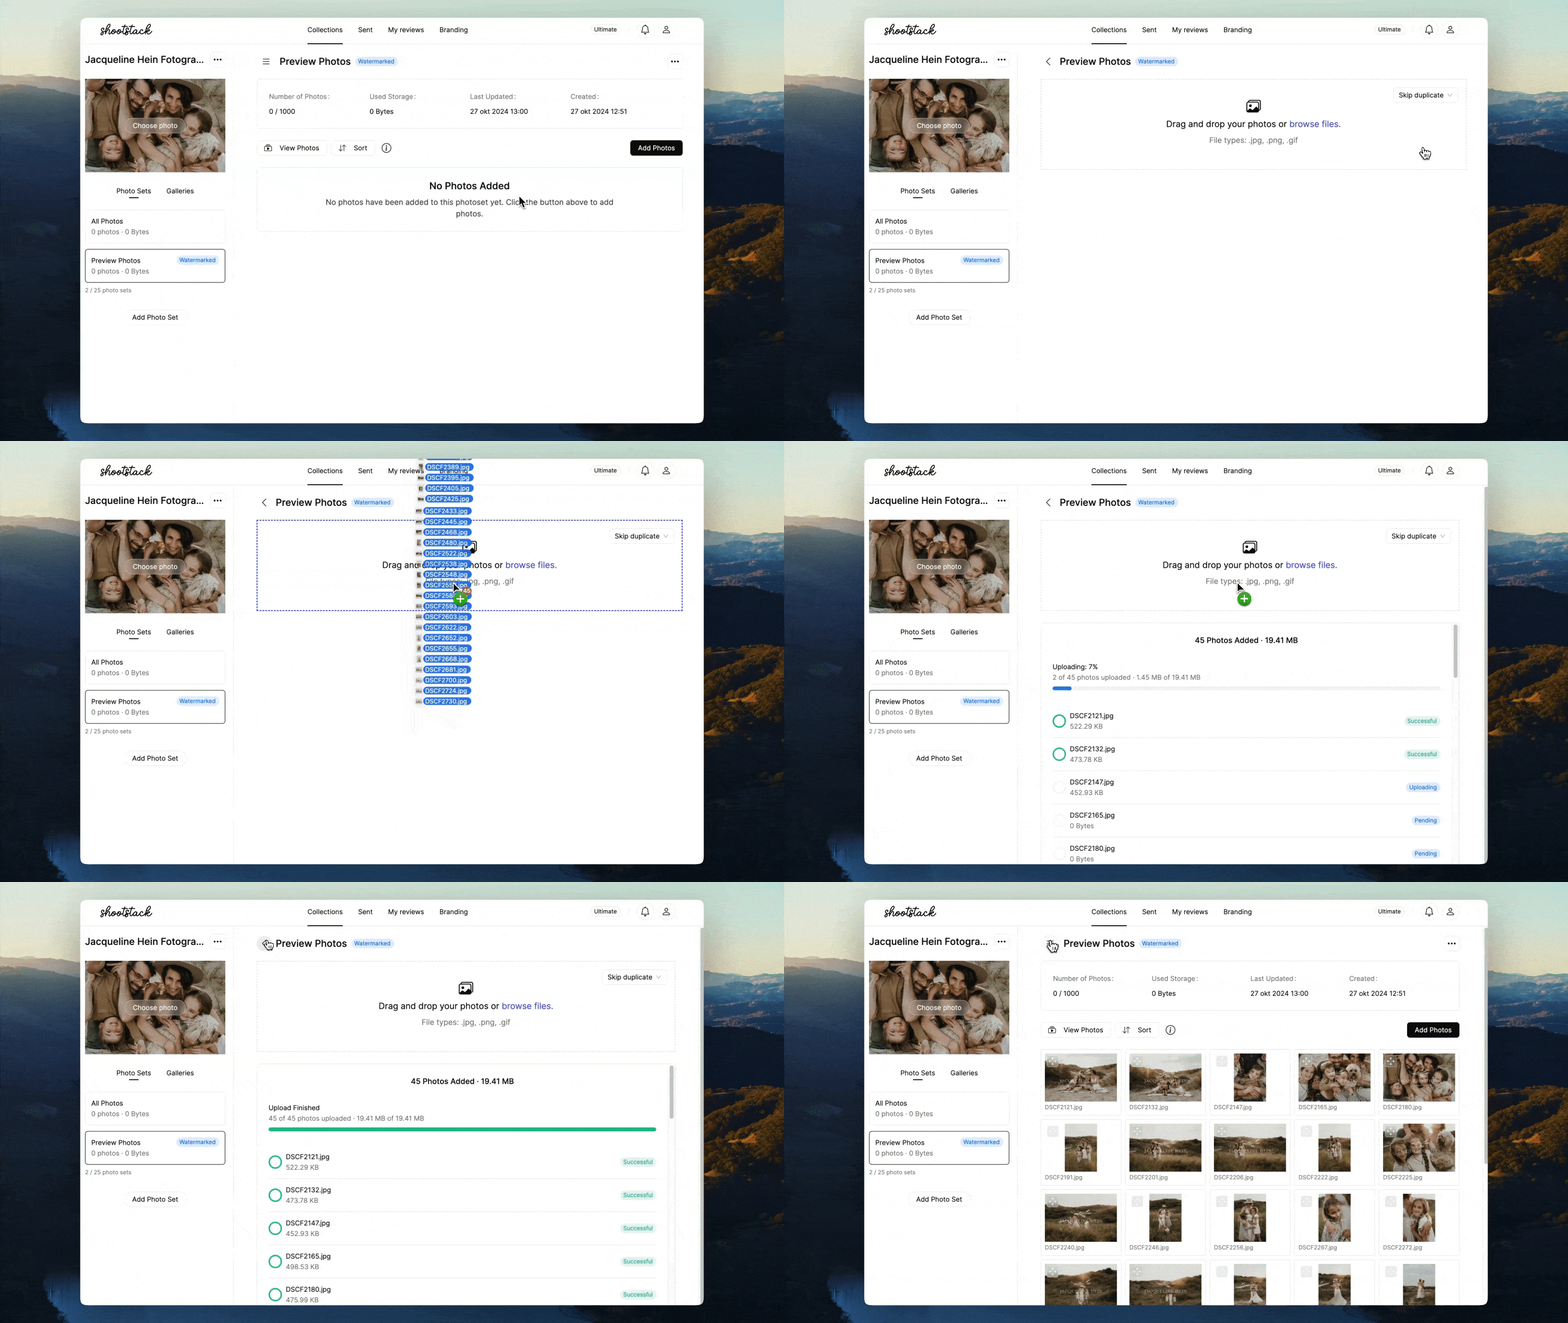
Klik op Foto's Toevoegen om je foto's te uploaden. Alle foto's in deze watermerk fotoset zullen automatisch beschermd worden met het gekozen watermerk.
2. Proofing galerij instellen
Klik op Galerijen om de galerij in te stellen. Loop alle tabjes langs om te controleren of alle instellingen goed staan. Voeg onder het tabje Fotosets de fotoset Preview foto's toe. Dit is wat je klanten te zien krijgen in hun galerij.

Zorg dat downloads uit staan en favorieten ingeschakeld, zodat je klanten hun favoriete foto’s kunnen selecteren.
Goed om te weten: Foto’s met een watermerk kunnen nooit gedownload worden uit de galerij. Zo zijn je beelden altijd beschermd tegen misbruik.

3. Laat klanten hun favorieten selecteren
Verstuur de proofing galerij naar je klanten door te klikken op Versturen of kopieer de URL en deel deze via je eigen email applicatie of bijvoorbeeld Whatsapp.

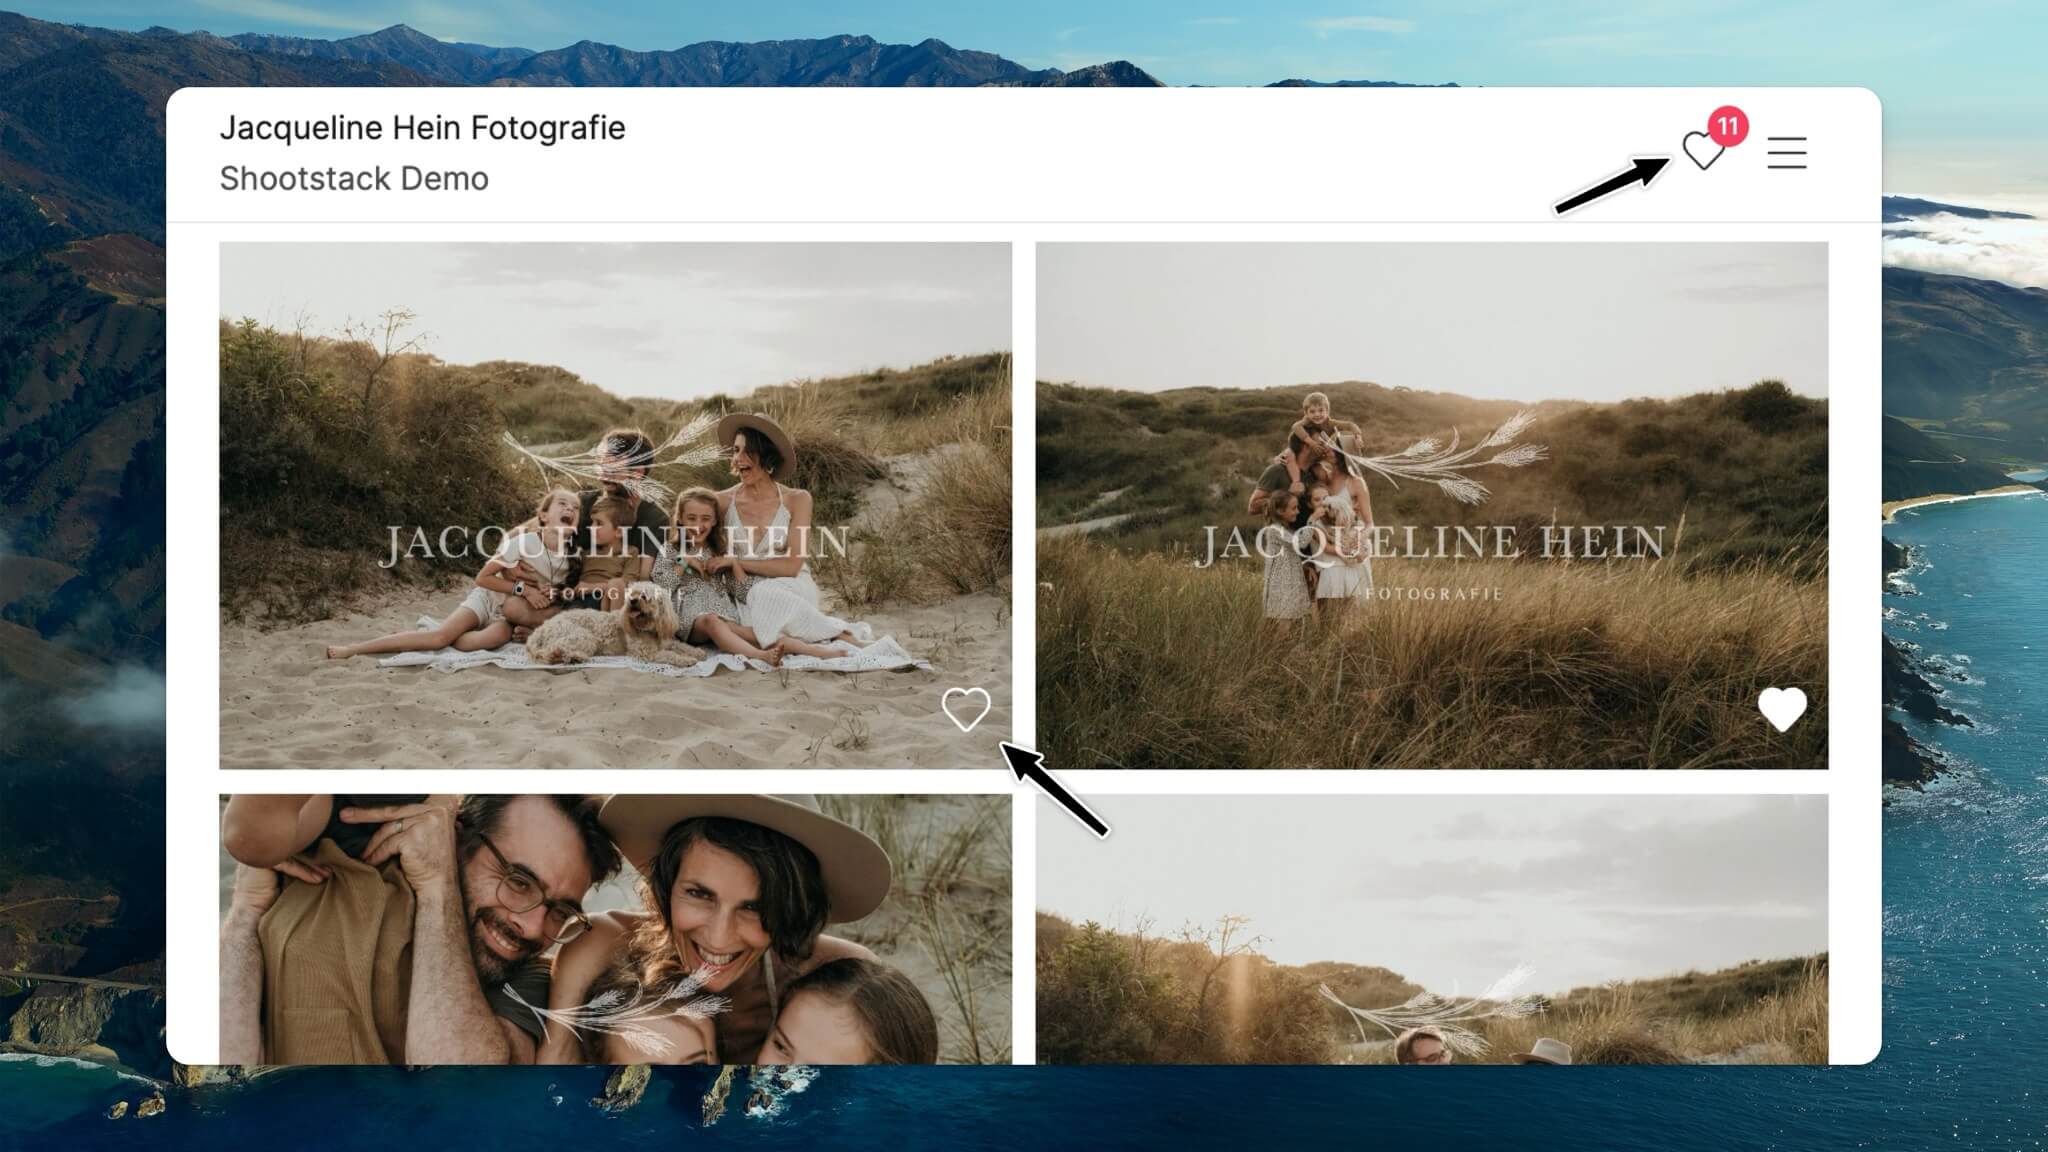
Leg uit aan je klanten dat ze op het hart icoontje kunnen klikken om hun favoriete foto's te selecteren. Zodra ze de selectie hebben gemaakt kunnen ze via het hart icoontje in het menu al hun gekozen foto's bekijken. Hier kunnen ze ook een opmerking plaatsen bij de foto.
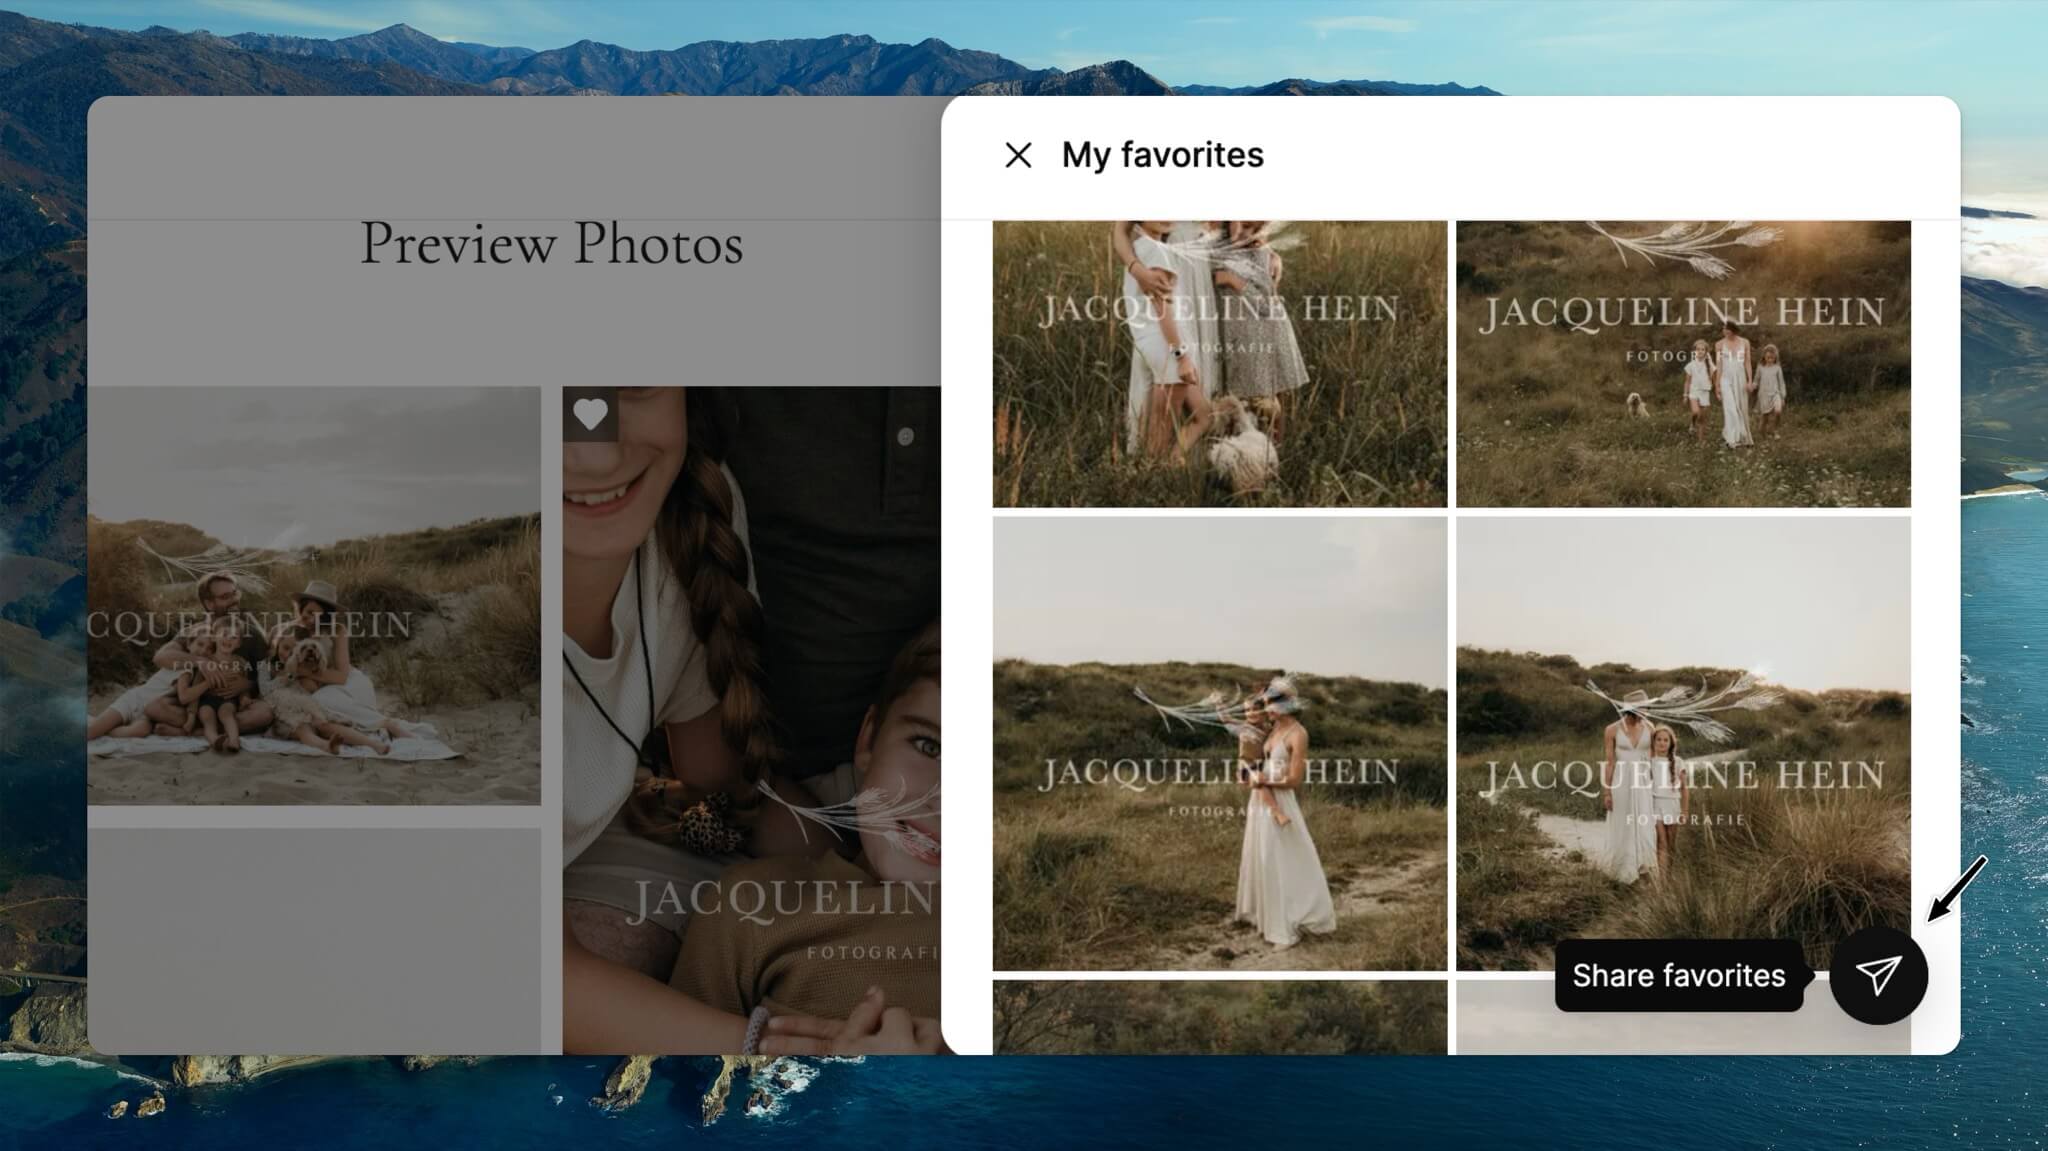
Het is belangrijk dat je klanten op de button Favorieten Delen klikken in hun favorietenlijst zodra ze klaar zijn met hun selectie. Pas nadat ze dit gedaan hebben, ontvang jij een melding dat hun lijst definitief is. Zo voorkom je miscommunicatie en weet je precies wanneer je verder kunt met de volgende stap.
4. Bekijk de favorietenlijst
Ga naar Activiteiten in de galerij en selecteer Favorietenlijst om de gekozen foto's te bekijken.
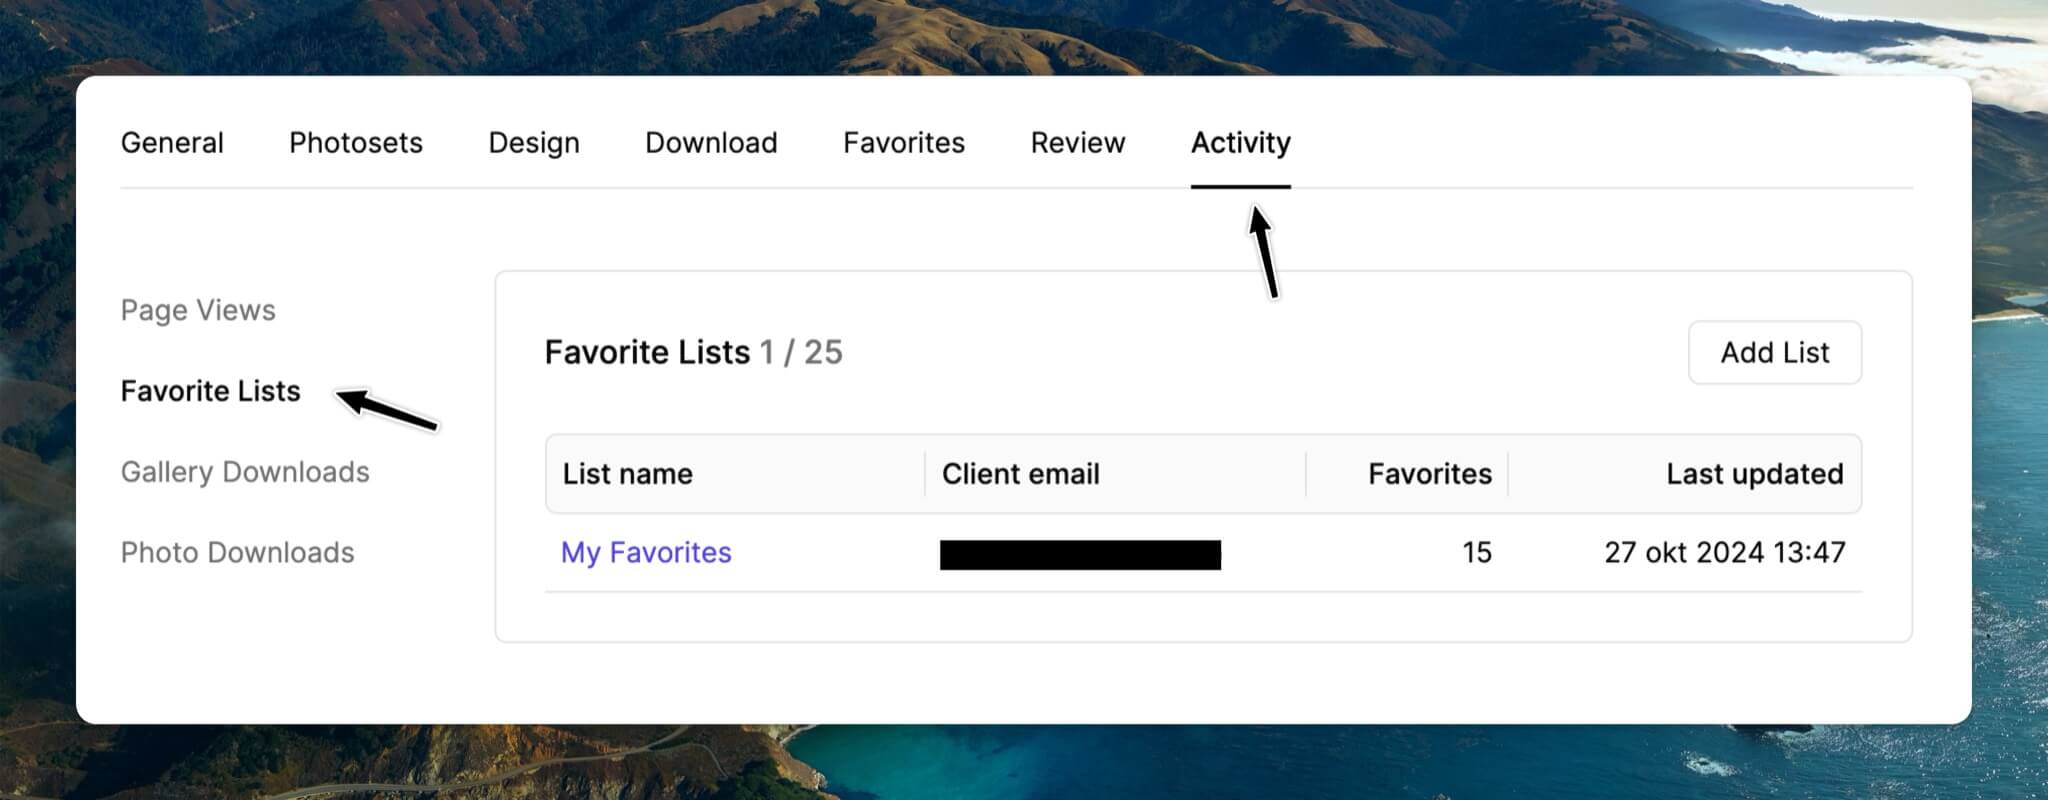
Vanaf hier heb je verschillende opties:
Optie 1: Favorietenlijst kopiëren naar een nieuwe fotoset
Je kunt de foto's uit de favorietenlijst kopiëren naar een nieuwe fotoset. Hierbij wordt het watermark automatisch verwijderd. Deze werkwijze is ideaal als je alle foto's van je klant al hebt bewerkt.

Optie 2: Favorietenlijst kopiëren naar Lightroom
Als je de favoriete foto's nog moet bewerken, klik dan op Bestandnamen kopiëren om ze in Lightroom terug te vinden.
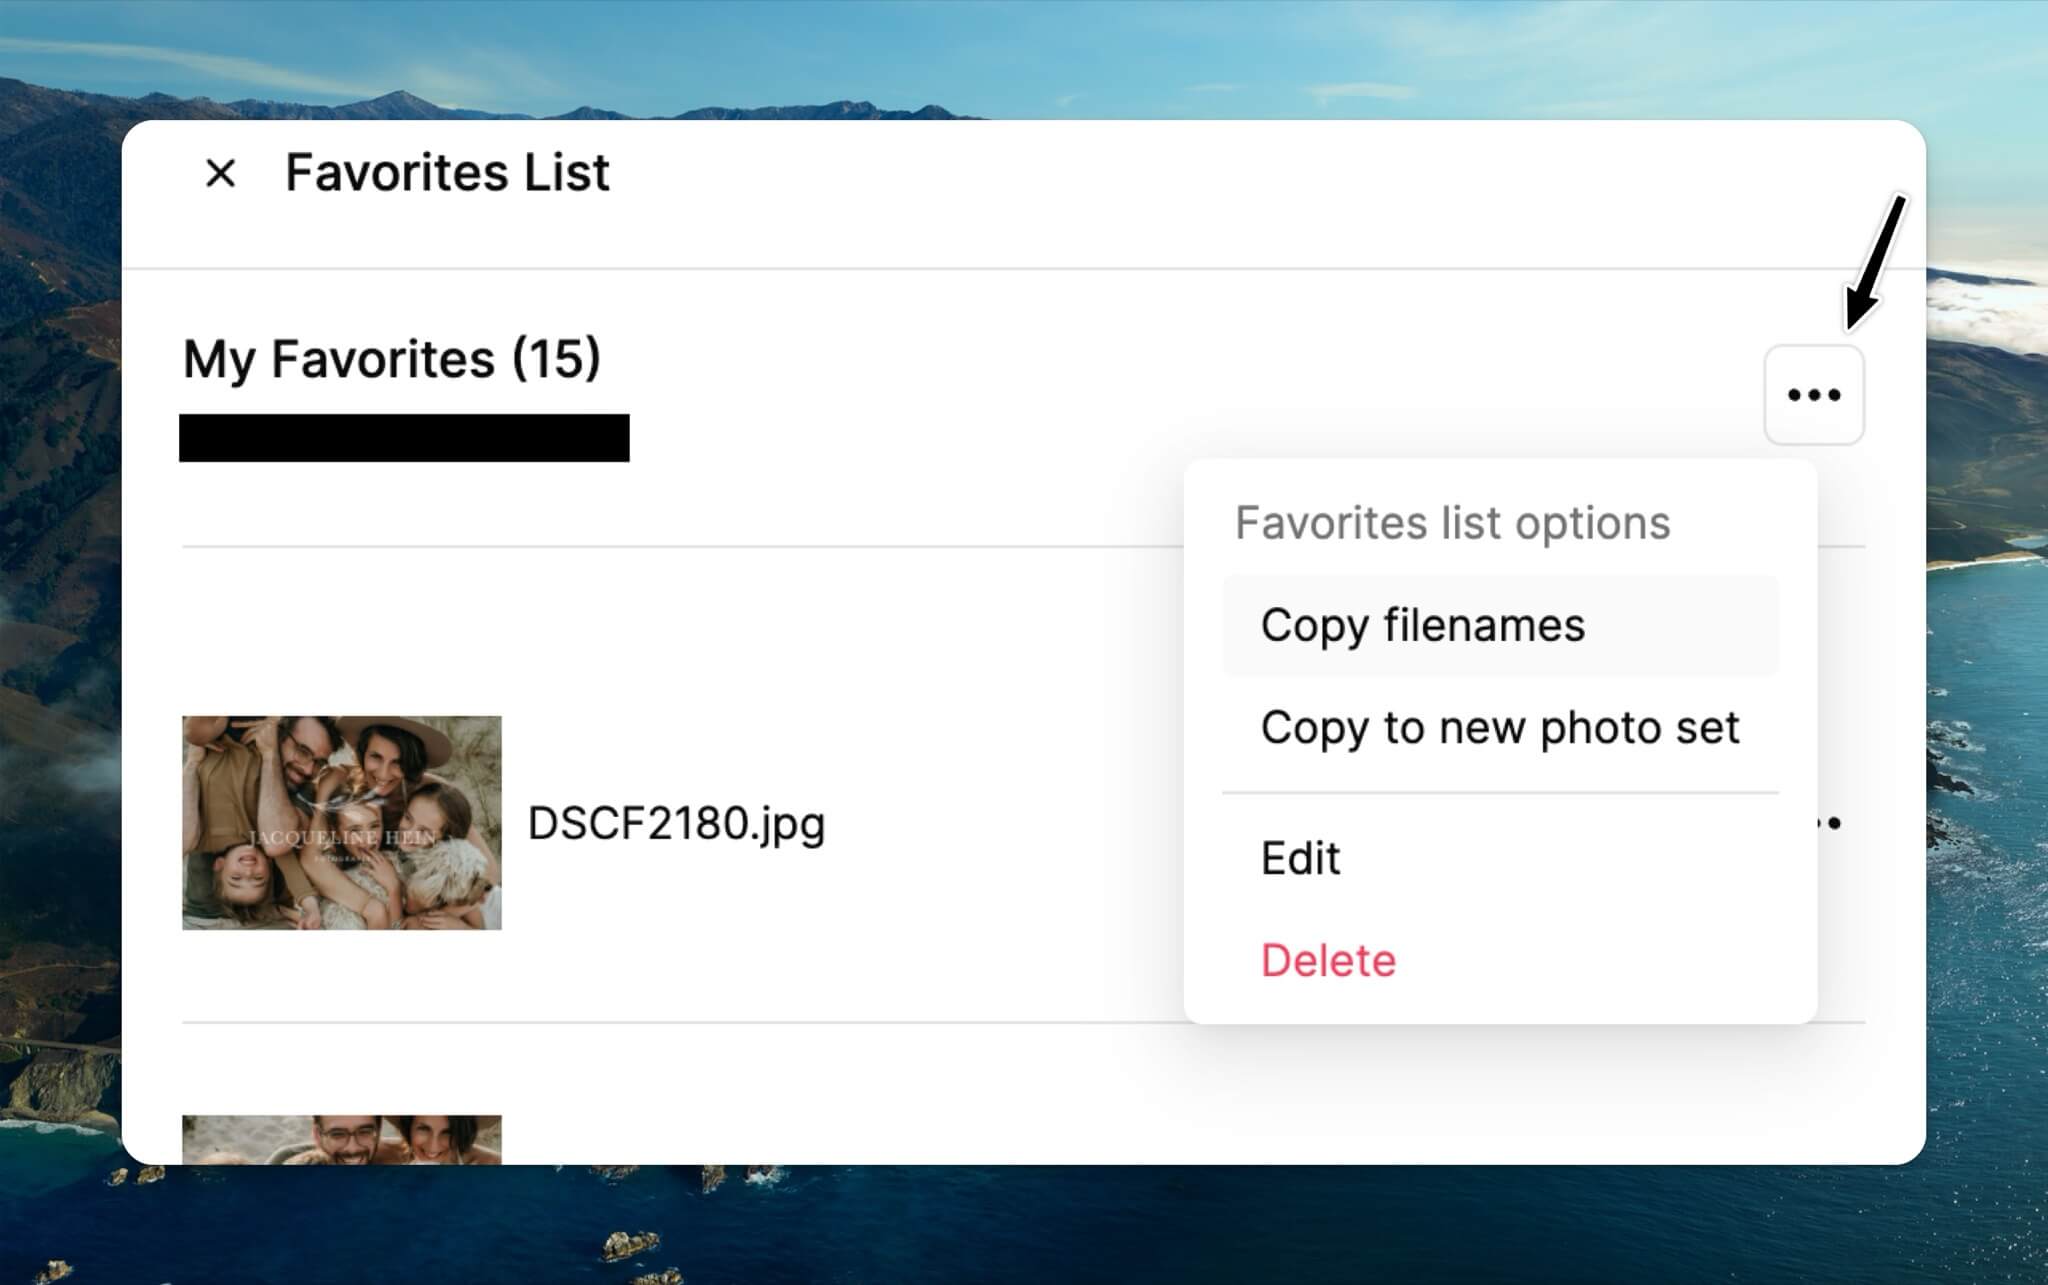
Open vervolgens Lightroom en plak de bestandsnamen in de bibliotheek filter. Druk op Cmd/Ctrl + F, kies voor Tekst, selecteer Bestandsnaam en plak de gekopieerde bestandsnamen in het zoekveld. Zo vind je snel en eenvoudig de juiste foto's terug.

Belangrijk: dit werkt alleen als je de bestandsnamen niet hebt aangepast bij het uploaden van de foto's naar Shootstack. Zorg ervoor dat de bestandsnamen exact hetzelfde zijn, anders kan Lightroom de juiste foto's niet terugvinden.
Na het afronden van de bewerking exporteer je de foto's in hoge resolutie uit Lightroom. Maak dan een nieuwe fotoset aan en upload je de definitieve beelden.
Heb je nog steeds moeite met het kopiëren van je favorieten naar Lightroom? Bekijk dan deze uitgebreide guide.
5. Definitieve galerij
De laatste stap is om de definitieve galerij aan te maken. Dit kan je op twee manieren doen:
Optie 1: Voeg de definitieve fotoset zonder watermerk toe aan de bestaande galerij
Klik de galerij aan en loop alle instellingen langs. Voeg in de Fotoset tab de nieuwe fotoset zonder watermerk toe.
Je kunt er vervolgens voor kiezen om de preview fotoset te verwijderen of deze in de galerij te laten staan. (Dit kan handig zijn als klanten later nog extra foto's willen uitkiezen)

Optie 2: Creëer een nieuwe galerij
Om een nieuwe galerij aan te maken klik je op Galerij Toevoegen en vul je de galerij naam in. Vervolgens klik je op het tabje Fotosets en voeg je hier de fotoset zonder watermerk toe.

Op deze manier heb je twee galerijen: de eerste is de preview galerij met de watermerk fotoset, en de tweede is de definitieve galerij. Elke galerij heeft een eigen URL, zodat je klanten later altijd kunnen terugkeren naar de preview galerij om eventueel extra foto's te selecteren.
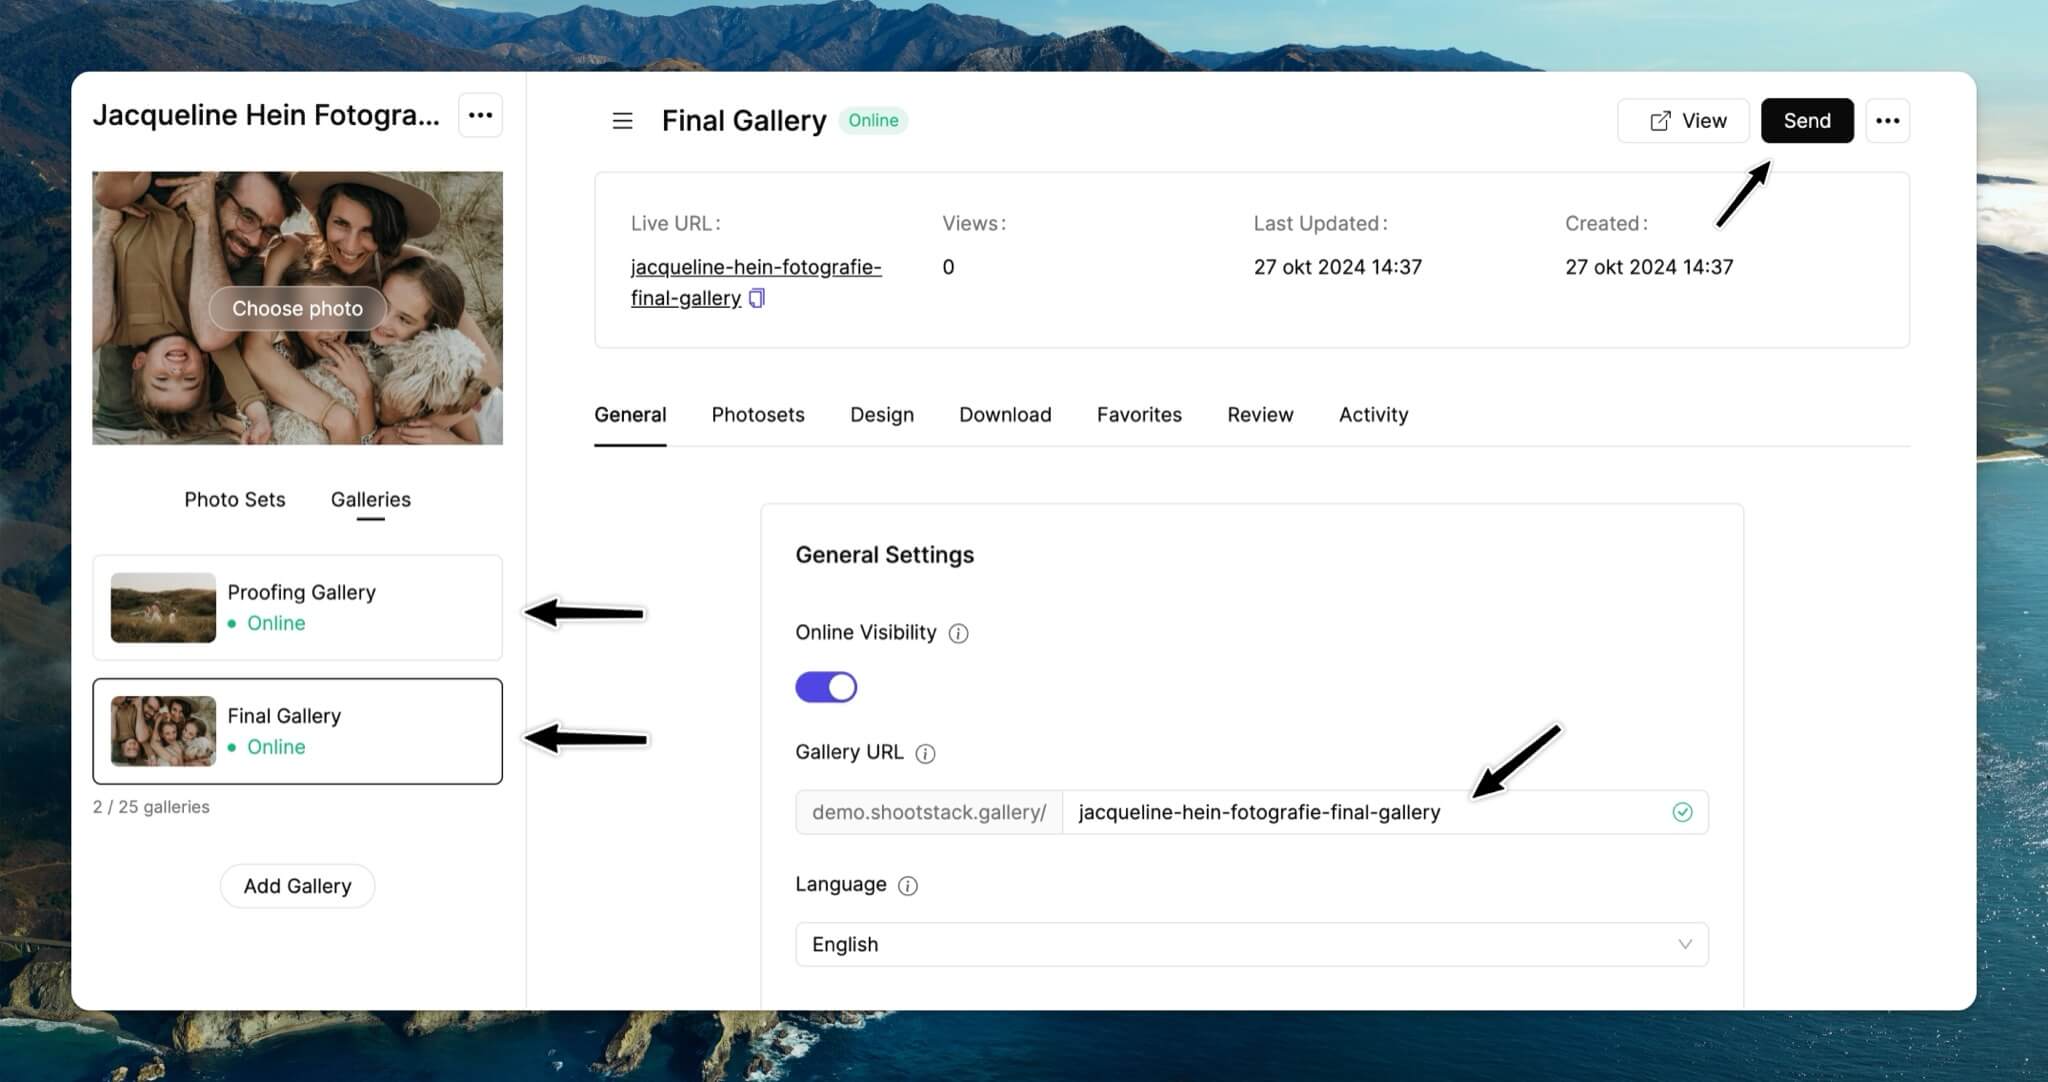
Tot slot: zorg ervoor dat je de downloads aanzet voor je klanten en zet review aan zodat klanten een review kunnen achterlaten. Verstuur de nieuwe galerij nu naar je klant.
Om meer te leren over galerij instellingen, klik hier.

